See these articles
First of all Get Into Network Settings:
In Sugar, right click on XO and choose "My Settings". That's the icon in the centre of the circle.
Then Choose the Network Icon; Scroll Down to Advanced Network Settings and click the "Launch" button.
Sometimes it appears behind, it's ok to close the Settings windows to uncover it
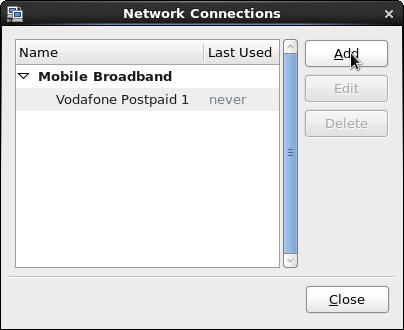
In Gnome, click Applications, Other, Network Connections
Click “Add”
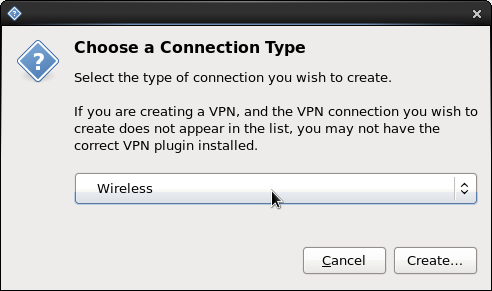
Change the connection type to “Wireless” and click “Create”

You can call the connection anything, I used “idet” in this example
The SSID is Case Sensitive, so enter exactly as shown above.
Older Networks used QDETA-X instead.
Nothing else should be modified on this TAB, click the “Wireless Security” TAB to continue.
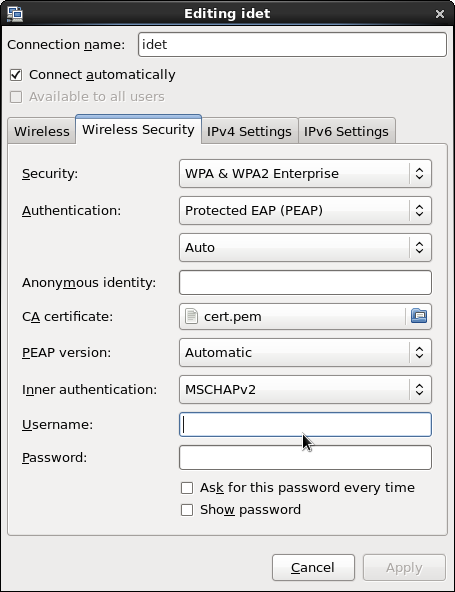
Select the Security mode “WPA & WPA2 Enterprise” and the rest of the fields will appear.
Set the Authentication to “Protected EAP (PEAP)”
For the CA certificate, iDET does not require one, but this screen will not save without one, so you must choose one. Browse through “File System” etc pki tls and select cert.pem
Enter the MIS UserName for this computer
For the password you can enter it here or check the box to have it ask each time
Click Apply
You have now created a connection, but it won't work yet.
Run the terminal application.
In Sugar, Terminal is not it the favorites, so goto the All Apps list to find it.
In Gnome, Applications, System Tools, Terminal
Become superuser, type "su -" and press enter.
Change folders to Network Connections, type "cd /etc/NetworkManager/system-connections"
Edit the config file you made, eg type "gedit idet", type "ls" for a list of files.
Remove the line that says "ca-cert=/etc/pki/tls/cert.pem" or whatever cert you chose.
Save your changes and exit the editor.
Now you connection should work. I'll explain how to make it connect later.
In Sugar, right click on XO and choose "My Settings". That's the icon in the centre of the circle.
Then Choose the Network Icon; Scroll Down to Proxy
Set the following as save it.
| Method | Manual | |
| HTTP Proxy | proxy.uq.edu.au | 80 |
| HTTPS Proxy | proxy.uq.edu.au | 80 |
If you would like to automate this setup, you can download a file and save it to a USB stick then run the script on each computer.
Download the setup_wireless file
You may need to cutomise the script to set the proxy server for example. I recommend using gedit on the XO. eg "sudo gedit /run/media/olpc/LIVE/setup_wireless"
Save the file onto a USB Stick, [if you know the volume label of your USB Stick, this will be handy later]
In Sugar, Terminal is not it the favorites, so goto the All Apps list to find it.
In Gnome, Applications, System Tools, Terminal
In Terminal type "sudo bash /run/media", then press the TAB key (3 or 4 times) to complete the line until the name of your USB Stick appears, eg /run/media/olpc/LIVE/ and then add the script name "setup_wireless" so the complete command reads "sudo bash /run/media/olpc/STICK NAME/setup_wireless". Press ENTER.
If you have an older XO, the mount point will be /media/STICK NAME/ rather than /run/media/olpc/STICK NAME/
Enter the MIS UserName for this computer
Enter the MIS Password (optional) or just enter
Enter the command "reboot"
Alternatively you could copy the set_wireless script onto the computer permanently eg "sudo cp /run/media/olpc/STICKNAME/setup_wireless /usr/sbin/" followed by "chmod +x /usr/sbin/setup_wireless", and from then on you can run the setup_wireless command anytime on the XO laptop, so long as you are in terminal (as super user or by sudo).
In Gnome, Click the Wireless signal strength meter and choose "Connect to Hidden Wi-Fi Network..."
In the connection dropdown list, choose iDET (or whatever you called it).
Click Connect, then when connected, choose Applications, Internet, Epiphany Web Browser